Sunday, January 20, 2013

Coconut Mist Cake


Hello gorgeous!
Oh, lovely Coconut Mist Cake, how did I miss you? Tucked away in a tiny recipe booklet dating to 1985 and extravagantly titled "Collection of Riches: An Indulgence of Recipes for Chocolate and Coconut Lovers," I've somehow overlooked Coconut Mist for far too long. The booklet, produced by the fine folks at Baker’s (of the German Chocolate and Coconut fame), does indeed provide an embarrassment of culinary riches within its frail pages. And first up is this gorgeous winner.

My mom single-parented my brother and I, and one of our favorite excursions was to the local grocery on a Friday night. Exhausted after a week working one of her three jobs, Mom let us choose our own adventure for dinner, with the results usually including the (then new) Tim’s Cascade Potato Chips and the (sadly, now defunct) San Francisco Seltzer, raspberry flavor. And on a really glorious, throw-caution-to-the-wind night, Mom led us over to the frozen-foods aisle and let us chose a dessert.
Creamed butter with wet and dry ingredients.

For those not familiar with the desserts that reside in the frozen-foods aisle, we will now observe a moment of silence. In the ‘80s, Pepperidge Farm dominated the aisle with jelly rolls, cinnamon rolls, and, my personal favorite: The coconut cake. When it was my turn to chose a sweet frozen treat, I went for it every time (even over its chocolate sibling). A small but sophisticated white cake covered in white frosting and sprinkled generously with coconut, this was my childhood version of heaven.

Hot out of the oven: A golden brown beauty.
The idea of any frozen cake is, of course, that you will take the time to defrost the treat in a manner keeping with the genteel nature of your upcoming gathering. Please. There is almost nothing better than a Pepperidge Farm coconut cake eaten straight out of the box, only semi-defrosted. Is anyone who buys frozen desserts really thinking ahead? If you’re thinking ahead, you have time to make homemade. No, I think the frozen-dessert aisle exists for midnight bingers and breakups, which, in my book, doesn’t make the goodies found there any less delicious.
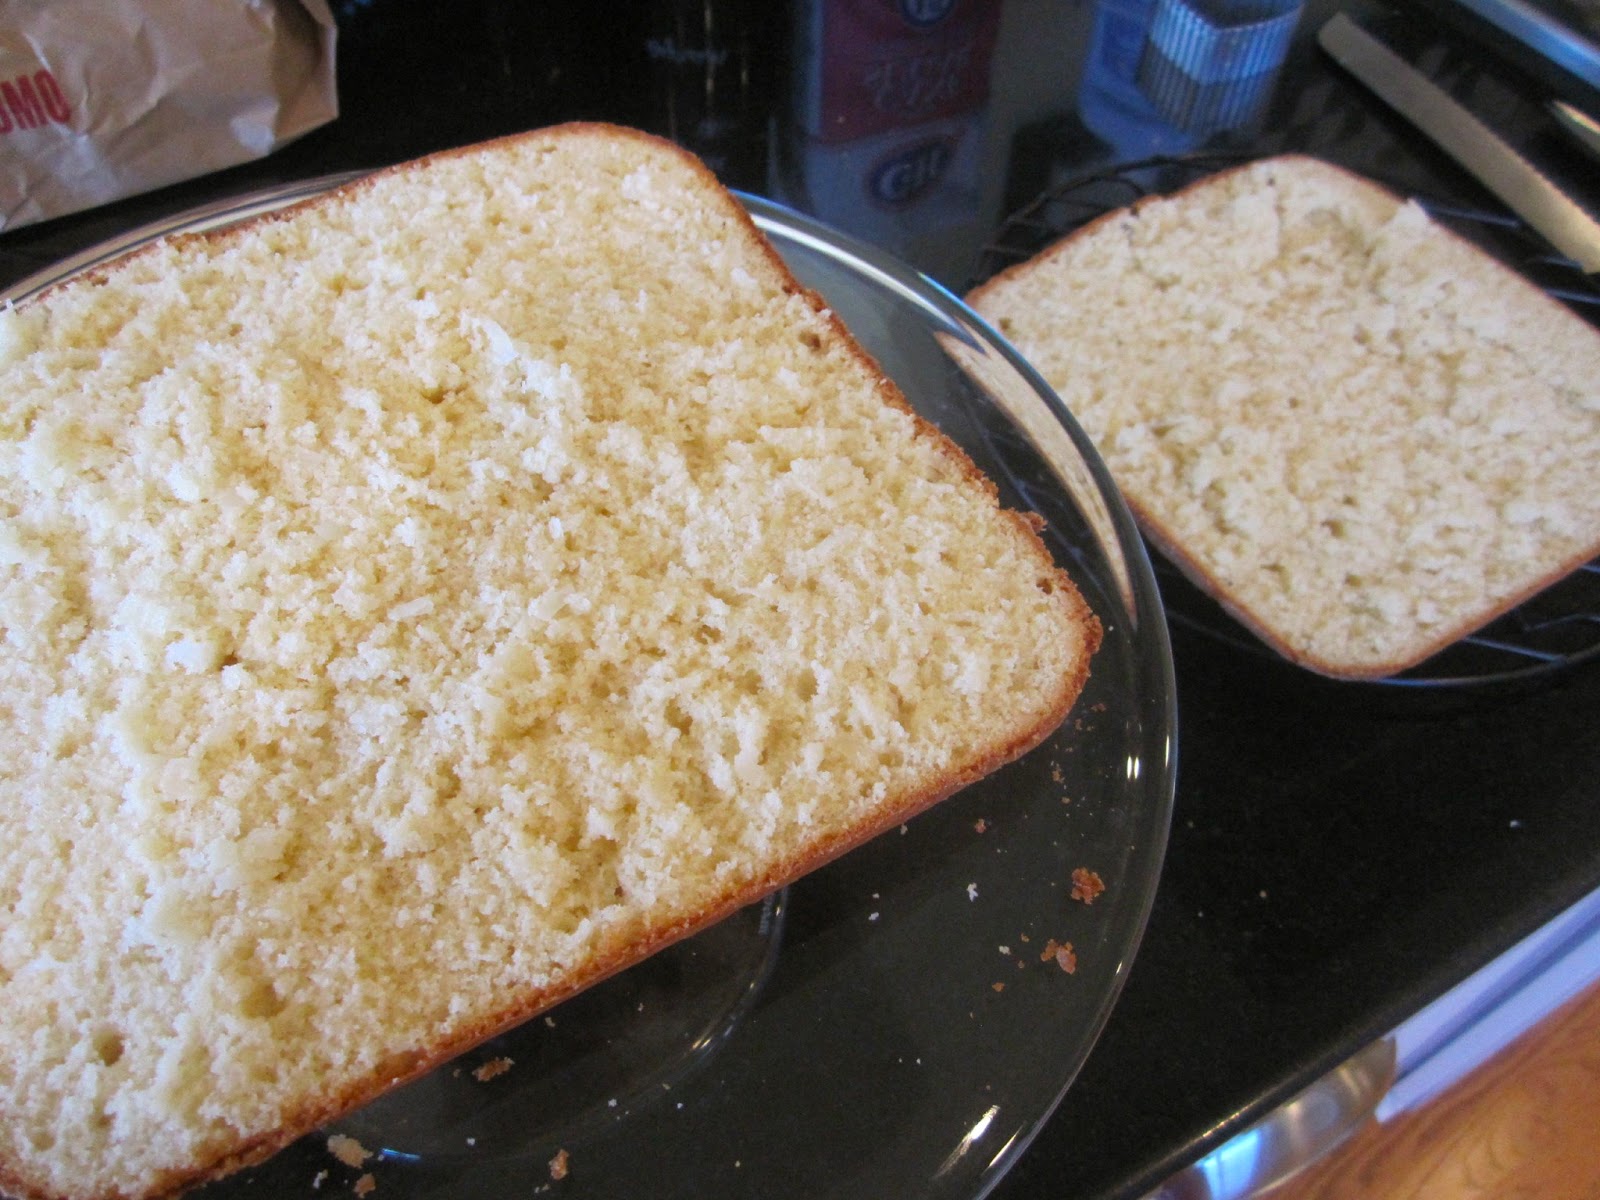
Split the cake into two layers with a serrated knife.
I was pleased to see the Pepperidge Farm version still on offer today at my local store. But with the discovery of this Coconut Mist Cake, I also know I’ll not soon need to purchase it. This homemade lovely is studded with coconut at every turn – in the simple batter, in the luscious jam filling and finally, atop the fluffy Cool Whip frosting. It’s the kind of cake you can easily conjure up on a moment’s notice, not needing to fall back on a run to the frozen-foods aisle. Unless it’s midnight and you have a broken heart. In which case, Godspeed my dear reader. Godspeed.

Yes, this filling is good enough to eat with a spoon.
Coconut Mist Cake

1-1/4 cups all-purpose flour
¾ cup sugar
1-1/2 tsp. Calumet baking powder
½ tsp. salt
¼ cup butter or margarine, at room temperature
½ cup milk
½ tsp. vanilla
1 egg
2-2/3 cups (about ) Baker’s Angel Flake coconut
2/3 cup raspberry jam or preserves
3-1/2 cups thawed Cool Whip whipped topping

With original recipe in background.
Mix flour, sugar, baking powder, and salt. Cream butter to soften. Add flour mixture, milk and vanilla. Mix until all flour is moistened, then beat 2 minutes at medium speed of electric mixer, scraping bowl occasionally. Add egg; beat 1 minute longer. Stir in 2/3 cup of the coconut. Pour into 8x8x2-inch pan which has been greased and floured. Bake at 350-degrees for about 40 minutes, or until cake tester inserted in center comes out clean. Cool in pan 30 minutes; remove from pan and finish cooling on rack.

Split cake into 2 layers. Reserve 1 tablespoon jam for garnish; mix remaining jam with 2/3 cup of the coconut and spread between layers. Cover top and sides of cake with whipped topping and remaining coconut. Garnish with reserved jam.


Beautiful inside and out!
Notes:
·      Like my heart garnish? Yeah, me too. Perfect for Valentine’s Day! Just fill a cookie cutter with jam, let set for a minute and remove.
·      I’d recently been gifted a jar of homemade blackberry jam, which was just destined to be used in the filling. I think the called-for raspberry jam would be divine, as would cherry or apricot jam, or lemon curd or even orange marmalade.
·      I used a serrated knife to cut through the cake layers. Make sure the cake is completely cool.
·      Once frosted, I threw the whole thing in the refrigerator for a few hours. There is almost nothing better in my book than a good, dense, cold piece of cake. Plus, chilling it allowed the Cool Whip to really sink into the cake.

Delicious, and no heartache required.
Why Don’t You …
·      Try this with real whipped cream frosting?
·      Make a several-layer version for a larger gathering?
·      Take a pass through the frozen-foods aisle next time you need a quickie dessert or a full-fledged binge? No thawing necessary!

Sunday, January 6, 2013

Popcorn Cake


Kiss your New Year's diet resolutions goodbye.
My friend Lydia sent me this sweet email after New Year’s:

I was going thru my Mom’s recipe box over the holidays and came across a recipe I wrote up during the ‘80s. It made me think of you: Popcorn Cake! Basically it's a popcorn ball recipe with M&Ms and peanuts added and smushed into a 9x13. If anything, it'd be an easy recipe to do w/the kids.

I shivered from head to toe. Because at the exact moment I was reading Lydia’s email, my own recipe for Popcorn Cake was sitting at my elbow, all ready to be put to use as the first recipe of 2013. Time Capsule kismet! And all the more reason to throw New Year’s resolutions to “eat healthier” to the wind and embark on a recipe at least two girls in the ‘80s were keen on.

And it’s not hard to see why. As Lydia aptly describes, Popcorn Cake really is a glorified popcorn ball. Our recipes are similar but not identical, which makes these “hand-me-down” recipes all the more fun to collect and compare. (She grew up in Southern California, so I can officially say Popcorn Cake was having a West Coast moment – at the very least.)

The air popper at work.
My recipe is vague in both measurement and directions, but no wonder because it’s hand-written by me, circa 1983. The misspellings prove I still had to face my fifth-grade nadir, Ms. Dee (see Cheese”bugar” Pie), but does provide a charming glimpse of my 8-year-old self, if I say so myself.

I have absolutely no recollection of ever eating this during my childhood, but it is full of childish ideas of gourmet: salted peanuts, M&Ms, marshmallows and, of course, the popcorn. It’s hard to remember today, when the microwave has made popcorn an every-day affair, but when I was a kid, it was an event to get out the popcorn popper.

Melting marshmallows ...
Toward that end, I air-popped nine cups of popcorn (about 1/3 c. of dry kernels) and tossed it with the peanuts and M&Ms. Melting the butter and oil and marshmallows on the stove, I was reminded of one of my very favorite no-bake yummies, the Rice Krispie treat. But as I looked at the big greasy pot of oozing marshmallows, I also started to question the authenticity of my hand-written records. This was going to be one oily popcorn ball! Perhaps my recipe should have stated, “1/2 cup butter or oil” instead of both?

Sure enough, pouring the melted marshmallow mixture over the popcorn resulted in a very moist concoction. And, because it was hot, it also caused the M&Ms to melt and add to the resultant goop – a nice trick, but one that further confirmed my suspicions that there was more than enough goo to go around.

The wet and dry ingredients meet, and melt.
Really, I’ll eat anything once (in case you haven’t noticed), and I was more than game to dive into a piece of Popcorn Cake. After letting it firm up for about an hour, I cut into the pan. I’m happy to report that Lydia and I weren’t far wrong whenever we stumbled upon our respective recipes during our formative years. Popcorn Cake is very moist (yes, next time I’ll just use butter or oil, but not both), but tastes like a cross between Cracker Jack, Rice Krispie Treat and popcorn ball. I’d like to think that is also cheaper and a wee bit healthier than a traditional Rice Krispie treat.

Popcorn Cake promises to trim down with less fat in 2013.
There’s no denying that my original recipe for Popcorn Cake could use a few tweaks. But it provided a great entrée to the new year, and a fun reminder that food can and does span the decades and the geography between us. Enjoy!

“My” Popcorn Cake (reprinted as originally hand-written)

Ingredients
-9c or more of cooked popcorn
-1c M&Ms
-1c salted Spanish peanuts

Instructions
1.     Mix (above) ingredients in large bowl
2.     Melt together ½ c buter or margarine, ½ c Sufflower oil, 1 pkg small marshmellows
3.     Beat mixture so it isn’t separated
4.     Pore marshmellows mix popcorn mix and push down into mold or or pan which is greased well.

The original hand-written recipe card. At the top right are my illustrations for popcorn, M&Ms and marshmallows.
Notes:
·      My grocery store had Spanish peanuts, but they weren’t salted. Since I was using plain popcorn, I went with roasted, salted peanuts, against the emphasis of my childhood self.
·      It is important to ensure the melted marshmallows and fat of your choosing are well combined. I found a wire whisk worked well (and added to my love of alliteration!).
·      Great tip from Lydia that I failed to follow : “Be sure to pick out the un-popped kernels. Want to avoid broken teeth.” I mean, is this woman wise or what?

Why Don’t You …
·      Experiment with other fats? My go-to Rice Krispie treat recipe uses ½ c. of peanut butter and just a few tablespoons of butter (in addition to the marshmallows), and I would love to try that here, too.

Lydia’s Popcorn Cake (featuring adult spelling)

Pour into a large bowl:
3/4 c popcorn kernels - popped. (I microwaved a bag, it's my 21st century addition)
6 oz Planters’ peanuts
8 oz (or more) M&Ms

Boil for 1 minute:
1 cup Karo syrup
1 tsp cream of tartar
1/3 cup sugar
1 tbsp butter    

Add 1 tsp baking soda. Stir. 

Pour over popcorn mixture, mix and pour into a buttered 9x13 pan.


Friday, December 28, 2012

Creamy Cocoa Bonbons

-->
Beautiful and simple, Cocoa Bonbons.
There are many holiday themed delights to be found in the Time Capsule, but this one caught my (adult) attention because of its quick and easy nature. Indeed, the entire process took me less than half an hour, and produced a sweet, fudgy treat – perfect for taking to a cookie exchange or popping in your mouth by the handful after a vigorous round of holiday shopping.

Several years ago, I watched Martha Stewart scoop chilled chocolate ganache into homemade truffles and was smitten. Although truffles are not really difficult (ganache being a concoction of chocolate, butter and cream, which is melted together, then chilled), they are messy, time consuming and relatively expensive. Three things I try to avoid this time of year.

From humble beginnings ...
Likewise, I have long desired to turn effortless fudge out of my kitchen at the holidays. Sadly, the last time I made fudge that did not seize, split or fail to set was in 2008. (Interestingly enough, that was my daughter’s first Christmas. How the heck did I have time to make fudge that year?)

So here I found myself, once again, knocking on the door of the mid-'80s. And, once again, the Time Capsule did not disappoint. This recipe, cut from my childhood paper, The (Everett) Herald, gloriously straddles the line between fudge and truffle, with the benefits of both economics and time on its side.

Let your cream cheese soften at room temp before whipping.
I was initially dubious that the cream cheese base would overwhelm the cocoa and sugar flavors, but I needn’t have worried. What it does do is lend a budget-minded creaminess, and, I’d like to think, a smidgen of health that isn’t to be found in more traditional truffles.

The process itself couldn’t be simpler – take softened cream cheese and mix in cocoa, confectioners sugar, a bit of butter and vanilla. Mix until combined, chill, than shape into bite-sized bliss. Voila! Holiday treats that keep your sanity and pocketbook intact. I’ll celebrate that combination!

Creamy Cocoa Bonbons

3 ounces cream cheese
2 cups confectioners’ sugar
¼ cup unsweetened cocoa
1 tablespoon plus 1 teaspoon melted butter
1 teaspoon vanilla

The finished batter, before chilling.
Soften cream cheese in small mixer bowl. Add sugar, cocoa, butter and vanilla and mix. Shape into ½-inch balls (you may need to chill this to make it handleable). Chill again completely. Store in refrigerator. Makes 2 dozen bonbons.

Notes:
·      I used reduced-fat cream cheese. This time of year, I would rather splurge on my full-fat stuff where I’m really going to taste it. If you are parsimonious in other dietary pursuits, by all means use the regular stuff.
·      I rolled the finished bonbons in confectioners’ sugar, chilled, then rolled again – rather the way you make good fried chicken by coating it twice. I found this allowed the sugar to really stick to the chocolate.
·      “Handleable” is their word, not mine.

-->
Why Don’t You …
·      Experiment with flavors? It boggles the mind really how far you could take some variations: almond extract with crushed almond coating; mint extract with crushed candy canes; vanilla and extra cocoa powder; almond and coconut; crushed potato chips or pretzels …
·      Whip up a batch for your sweetheart at Valentine’s Day?


Saturday, December 15, 2012

Traditional Chex Mix


The gang's all here for "Traditional Chex Mix."
My husband’s best friend Brad has many talents, not the least of which is making really killer Chex Mix. Brad insists, as do I, on the “original” recipe that is baked to perfection in a slow oven. So, like me, Brad would probably be stunned to see this recipe for Chex Mix, which is a far cry from the Mix I’ve been making and munching on for the last decade. The recipe itself looks like it was folded up in one of those teeny plastic bags and stuffed inside the cereal box itself, and is accompanied by some variations that I’m sure were cutting-edge at the time: Cajun, Peanut and my personal fave, Harvest (which features curry powder, chow mein noodles and raisins).

Melted butter awaiting more ingredients.
A quick glance at the Chex website, www.chex.com, and you’ll realize how quaint (and bland) the ‘80s really were. Today’s Chex Mix variations feature caramel, chocolate “blasts,” malted milk powder, BBQ sauce and powdered ranch dressing mix (but not all together – not yet). It seems that just adding pretzel sticks is not variation enough for our millennium. If flavor is not literally exploding around you while you’re parked on the couch watching the game, say the good people at Chex, why even bother snacking? The amount of time that has been spent creating modern Chex Mix variations – about half of which make me salivate and half of which activate my gag reflex – is astonishing. But kudos to the Chex cereal folks for turning a rather drab breakfast option into a snack that has endured for 60-plus years.

The 1980s "Traditional"
Whatever the ingredients, the basic concept of Chex Mix has stayed reassuringly the same: Melt some butter and seasonings in a large cookie sheet, stir in cereal and nuts, and bake, tossing every 15 minutes, until coated and crispy.  But this 1980s version is boring, even if it does feature more butter. I prefer a 21st century version featuring pretzels, a few more seasonings (less butter – sigh) and bagel chips. Though not technically from the Time Capsule, I’ve included it here. I think you'll be pleased.

Traditional Chex Party Mix
1/2 cup (1 stick) butter or margarine
1-1/4 teaspoons seasoned salt
4-1/2 teaspoons Worcestershire sauce
2-2/3 cups Corn Chex cereal
2-2/3 cups Rice Chex cereal
2-2/3 cups Wheat Chex cereal
1 cup salted mixed nuts

Preheated 350-degree oven. In 15x10x2-inch baking pan melt butter in oven. Remove. Stir in seasoned salt and Worcestershire. Gradually add cereal and nuts, stirring until all pieces are evenly coated. Bake 20 to 25 minutes, stirring every 10 minutes. Spread on absorbent paper to cool. Store in air tight container.

"Please, sir, could I have a pretzel?" says 1980s Chex Mix
My Traditional Chex Mix
3 cups Corn Chex cereal
3 cups Wheat Chex cereal
3 cups Rice Chex cereal
1 cup mixed nuts
1 cup bite-sized pretzels
1 cup bite-sized bagel chips, or regular-sized bagel chips, broken into 1" pieces
6 tablespoons butter or margarine
2 tablespoons Worcestershire sauce
1-1/2 teaspoons seasoned salt
3/4 teaspoon garlic salt
1/2 teaspoon onion salt

1. Heat oven to 250-degrees.
2. In ungreased large roasting pan, melt butter in oven. Stir in Worcestershire, seasoned salt and garlic and onion powders. Gradually stir in remaining ingredients until evenly coated.
3. Bake uncoverd 1 hour, stirring every 15 mintues. Spread on paper towels to cool, about 15 minutes. Store in airtight container.
 
Deliciously salty and crisp: My Traditional Chex Mix variation
Notes:
·      Chex would have you believe you can get identical results using your microwave. This is a lie. What you may gain in time, you lose in soul-sucking, limp Mix. Take an hour, lazy-bones, and make it the old-fashioned way.
·      Chex would also have you believe that their pre-made Mix (now available in the snack aisle at your local grocery) is identical to a batch of the homemade stuff. This is another lie. Take an hour and make it the old-fashioned way, without any shelf-stabilizers or guar gum.
·      I use Johnny’s Seasoning Salt and real butter.

Why Don’t You …
·      Gift some Mix? Traditional Chex Mix, or a salty variation thereof, is a great gift this time of year, when some people (I’ve heard tell) can get burnt out on the abundance of sweets.  I’ve found it keeps well in an air-tight container. Of course, it only sticks around for about 36 hours at my house, so I can’t vouch for its freshness after, say, a week.
·      Look at all the ways the word “air tight” is featured in this story! I prefer air-tight, the 1980s want it air tight, and the new millennium goes with airtight. We may not agree on syntax, but we can all agree: Chex Mix is delicious!